|
|
Audeonic |

Audeonic Home |
Understanding MidiBridge Scenes |
|
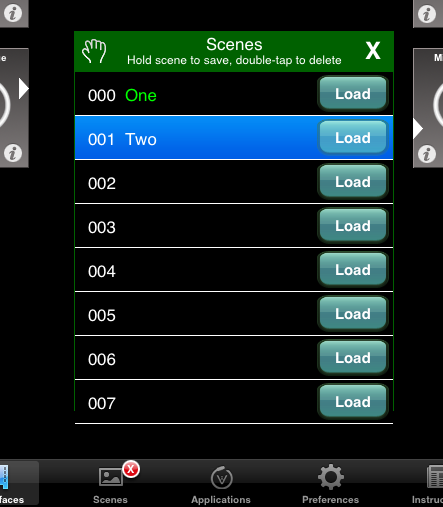
This guide will show you how to setup the new Scenes feature and the Program Changer module introduced in version 1.5. What is a scene? A scene is a snapshot of a MidiBridge configuration (routings and modules) that can be saved and recalled from the MidiBridge user interface or via a MIDI program change message. You can store up to 128 separate scenes and the scenes can be given a user friendly name. Scenes are managed via the 'Scenes Panel' which is accessible via the Scenes tab bar item at the bottom of the screen. On the iPad, the Scenes Panel is a floating panel (similar to the Applications panel) that you can show/hide/drag around the screen. On the iPod and iPhone, the panel is a full page, but accessed in the same way from the tab bar. 

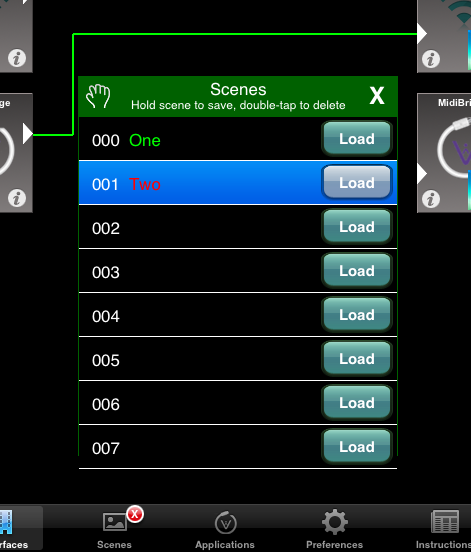
The panel is a list of 128 'slots', numbered 0 to 127, with each slot corresponding to the MIDI Program Change message value that will cause that scene to be loaded (more on that later). Each slot (when configured) has the name of the scene (set by the user) and a 'Load' button, which you press to switch to that scene. Pressing the 'Load' button (or if the relevant MIDI scene change message is received) will have no effect if the slot has not been configured. To save the current MidiBridge configuration into a scene, hold your finger on the slot (not the Load button!) until prompted to enter a name for the scene. Use the keyboard to set a name and press OK to save. If you want to delete a scene (irreversible!) you double-tap on the scene slot and then confirm the delete action. Whene a scene is loaded, the slot is highlighted, the slot name is shown as green, and the tab bar scene button badge displays the number of the currently loaded scene. 

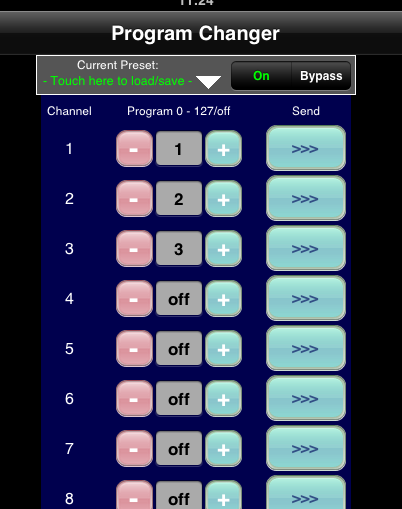
If a scene is currently loaded and you make changes to port routings or modules, then the slot name will change to red and the tab bar badge will also show an exclamation mark (!). This is to remind you that the current scene has been changed since it was loaded. If you wish to update the currently loaded scene, press and hold the highlighted slot to save. If you wish to save the changed scene into a different slot, then press and hold the new slot. Beware! - if a scene has been modified and you load another scene (via the Load button or MIDI message) then the new scene will be loaded immediately and any changes made will be lost. Loading scenes via MIDI MidiBridge will look for MIDI program change messages arriving at all enabled inputs (you enable/disable inputs via the Preferences/Options screen) on the channel(s) configured on the Preferences/Options page. By default, program change messages on all channels will be honoured, but you can select just one specific channel or disable scene changes via MIDI entirely by selecting the appropriate value.  Note - if a MIDI program message is received on an enabled input on the configured channel(s), but there is no scene configured at the corresponding slot, then no scene change occurs. Warning - there is currently no logic built in to MidiBridge to deal with held notes when a scene is changed. If a scene change occurs which removes a routing to an output where notes are being held then these notes will be 'stuck'. The rule of thumb is only hold down notes and change a scene if you know that the output(s) where the notes are being held will remain connected in the new scene. The Program Changer module This new module is available on all input and output ports and is accessed via the modules 'beaker' icon on each port. You can use this module to issue program change messages manually on demand or automatically when a scene is loaded.  Each of the 16 MIDI channels is listed separately so you may configure a different program change message for each channel. You use the 'selector' widget to set the program change number on each channel. To issue a specific program change message manually, press the '>>>' button. To issue many program changes at once, save your program changes into a preset and then load the preset to send all the program changes. You can use the Program Changer module in conjunction with the scenes feature, so that if a set of program changes is stored with a scene, then loading that scene (manually from MidiBridge's scene panel or via MIDI message) will cause the program messages to be issued. Note - if the Program Changer is on an input port (on left), then the program change message will be sent to all connected outputs. If the module is on an output port, then the program change messages are sent to just that output. Step by step example Here is a step by step example of how to setup a scene and have program changes issued when the scene is loaded.
We have produced a short video showing how to setup 2 scenes in conjunction with the Program Changer module to instantly switch between 2 sets of routings and changing sounds of apps being controlled on our youtube channel If you are having any issues with scenes/program change features, do please contact us or use our soapbox forum. |

This page does not use frames, cookies, java or plugins and should be viewable with just about any browser. Last updated 30 July 2022 (probably by hand using vi) |
