|
|
Audeonic |

Audeonic Home |
Understanding MidiBridge |
|
Don't forget to turn on the 'Run in Background' option in the MidiBridge Preferences panel. This is off by default (and purposefully as we want the user to consciously be aware that they are allowing MidiBridge to keep on runnin' in the background) The above applies to MidiBridge 1.3 and earlier. As of version 1.4, background processing is on by default (with a 15 minute idle timeout). The idle timeout value can be changed in the Options tab of the Preferences page. Setting it to 0 minutes turns backgrounding off completely. First a little about CoreMIDI - port advertising When an app runs it can register virtual ports in CoreMIDI that can be seen by other apps and on which other apps can send or receive events. There are two types of virtual ports (also known as endpoints) - sources and destinations. An app doesn't have to advertise its own virtual ports. It may choose to use the virtual ports of other apps instead. Here's something to remember: Just because an app doesn't advertise any ports of its own doesn't mean that it can't be controlled via MidiBridge! It just won't show up in: The Interface Tab - Sources to the left of you, destinations to the right This is the main tab in MidiBridge and from where you create connections between sources (inputs) and destinations (outputs). These ports are usually (but not always) in pairs and are one of the following type:
MidiBridge can route events from any of these types to any other type, but the routing must be between a source and a destination from MidiBridge's point of view. To connect source A to destinations B and C, you touch input/source port A on the left and then touch B and C on the right and green lines will be drawn between them to show they are connected. Touch port A again to tell MidiBridge you're done interconnecting to that port. Here's a screenshot of MidiBridge with just about every type of port, connection and option set: 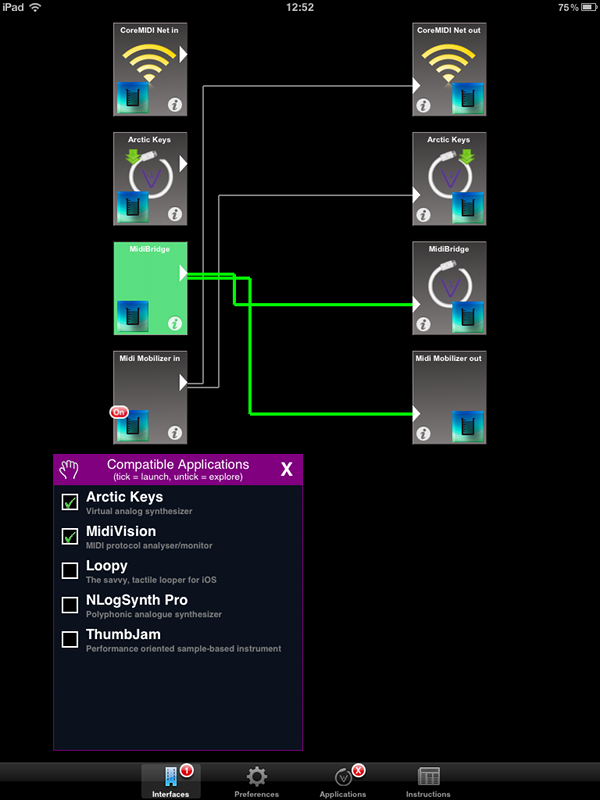 The above screenshot shows the following:
To summarise: An input from MidiBridge's view is a source of MIDI events from other apps, physical devices or the CoreMIDI network. An output from MidiBridge's view is a destination that MIDI events can be sent to and can be other apps, physical interfaces or the CoreMIDI network. Connecting different kinds of apps Apps can either generate MIDI events, receive MIDI events or do both. Apps fall into one or more of the following categories:
Categories 1,2 and 6 are easy. You just connect your desired source/destination to the app's virtual port in MidiBridge and away you go. You may need to tweak something in the other app to tell it you want it to accept/send MIDI on its virtual ports (and tell it to continue working in the background). Category 3 apps will not show up as a separate port in MidiBridge, but will read from MidiBridge's virtual output. To control these types of apps, just connect your desired source to the MidiBridge destination. Category 4 apps are the reverse of category 3. They don't show up in MidiBridge but to use them as sources, you connect MidiBridge's virtual source(input) to the destination you want the events to go to. Finally, category 5 apps require a little trick to make them work. In MidiBridge prefs, enter the word 'localhost' (without quotes) in the CoreMIDI Network Destination field and press the Connect button. You can also choose 'Connect Automatically' to re-start the connection when MidiBridge launches. Essentially you are hi-jacking the CoreMIDI network to run like a virtual port. To send events to the app that supports CoreMIDI network, you connect a source to the CoreMIDI net destination. Vice-versa for receiving events into MidiBridge from a category 5 app. Application start/connect order Now you know how to interconnect different types of apps, what about the order in which you launch the apps? It all depends upon when each app refreshes its view of the CoreMIDI world. MidiBridge for example refreshes its view when it starts, when it is returned from the background, when a physical device is connected/removed, when a virtual port appears/disappears and when a CoreMIDI network session starts/stops. Basically all the time. What's more is that it will automatically re-establish any prior connections that you had set for that port. So far, so good. Other apps may not refresh their view so much (some just at launch or need the user to manually refresh), so these are the rules of thumb when setting up your connections:
Unfortunately the world isn't perfect and sometimes even these rules are
not enough. If it doesn't work, you may need to switch to certain apps as
well to re-invogorate their engines. It's not exact and some trial and error
may be involved.
Giving NanoStudio a virtual input
With a little trickery it is possible to use MidiBridge to give
NanoStudio a virtual input so that it can be fed MIDI events from other
apps. Please note that NanoStudio works in the foreground so any app that
is to be used for driving it must be in the background. Note also,
that the order of these steps is crucial to work around the way in which
NanoStudio manages CoreMIDI.
The above steps don't really appear to do much, but they are crucial in
cementing the fabric to make NanoStudio only respond to the (now
looped back) network port without picking up the physical interface.
Driving Animoog from BeatMaker 2
Driving Animoog from BeatMaker 2 (either as a live instrument or as a
sequencer driven part) is possible using MidiBridge. Both Animoog and
BeatMaker are complex apps and require a lot of memory. You need an iPhone
4/4S or iPad 2/3 to run both simultaneously.
Here are the steps:
Now when you play in BeatMaker, Animoog will sound.
MidiBridge Cookbook
Here are two step by step guides for the 'tricky' apps like SampleTank
and SoundPrism.
Simple, really!
Connecting two iDevices running MidiBridge together over WiFi
You want to control an app/output on your iPad wirelessly from your iPod
and both are running MidiBridge. You need to connect the two devices
together by initiating a connection from one to the other:
NB. Both devices must be connected to the same Wi-Fi network, in case that
isn't obvious.
The 'Fast-switchable Applications' Panel - or what is OMAC and why do I care?
OMAC stands for Open Music App Collaboration and is a group of iOS music
app developers who are working together to create unofficial standards for
music apps in terms of MIDI and audio interaction. One of the prongs of this
is the OMAC App Registry for app fast-switching where users can rapidly
switch to other music apps without using the Home button from within the
app itself.
Audeonic is committed to this and hence as of MidiBridge version 1.3 (and
MidiVision 1.5) a 'Fast-switchable Applications' panel has been added that lets
you fast-switch or launch OMAC compatible applications.
Just because an app doesn't feature in the OMAC 'Fast-switchable Apps' list
doesn't mean that it can't be controlled via MidiBridge!
The list shown in this window has little to do with MIDI connectivity and
much to do with fast-switching. The list shows all fast-switchable apps
available for the device and, if they are ticked, then touching that app's
entry in the list will launch or switch-to that app.
If the app isn't ticked, then the app is not installed on the device and
touching the app's entry will take you to the App Store to see if that
particular app is of interest to you with the knowledge that if you do
install it, you'll be able to fast-switch/launch it from MidiBridge
directly.
Again, do not let yourself be confused by what this panel stands for. It
is only for fast switching and an app's absence from this list does not mean
that MidiBridge cannot send/receive events to/from it.
If your favorite app isn't on the list, then please let the developer
know. Full details on what they need to do are at the google group 'Open
Music App Collaboration' in the 'Introducing OMAC Registry' thread
here.
Video Help
The amazing people at iDesignSound, MusicApps.com.br and Tim Behrens have
all made videos showing MidiBridge in action. Here are the links, and thanks
to those above for making the movies.
iDesignSound iDesignSound MusicApps.com.br MusicApps.com.br Tim Behrens Tim Behrens |

This page does not use frames, cookies, java or plugins and should be viewable with just about any browser. Last updated 30 July 2022 (probably by hand using vi) |